

Ready to take your acoustic guitar playing to the next level? If you want to get a clear, professional sound when recording or playing live, using a microphone is key. But with so many different types of microphones and techniques out there, it can be overwhelming for beginners.
That’s where I come in- as an experienced musician and audio engineer, I’ve spent countless hours studying and experimenting with mic placement for acoustic guitars. So if you’re looking to learn how to properly mic your acoustic guitar, you’ve come to the right place! In this article, we’ll go through a step-by-step guide on how to achieve high-quality sound from your guitar using just one microphone. By the end of this article, you’ll have all the knowledge you need to confidently set up and record your acoustic guitar like a pro. So let’s tune in and discover the best way to bring out the beauty of your instrument through proper microphone placement!
So, how to mic an acoustic guitar?
1. Choose the right microphone: When it comes to micing an acoustic guitar, there are two main types of microphones to consider – dynamic and condenser. Dynamic mics work well for live performances as they can handle high sound pressure levels without distorting, while condenser mics are better for studio recordings as they capture a wider frequency range.
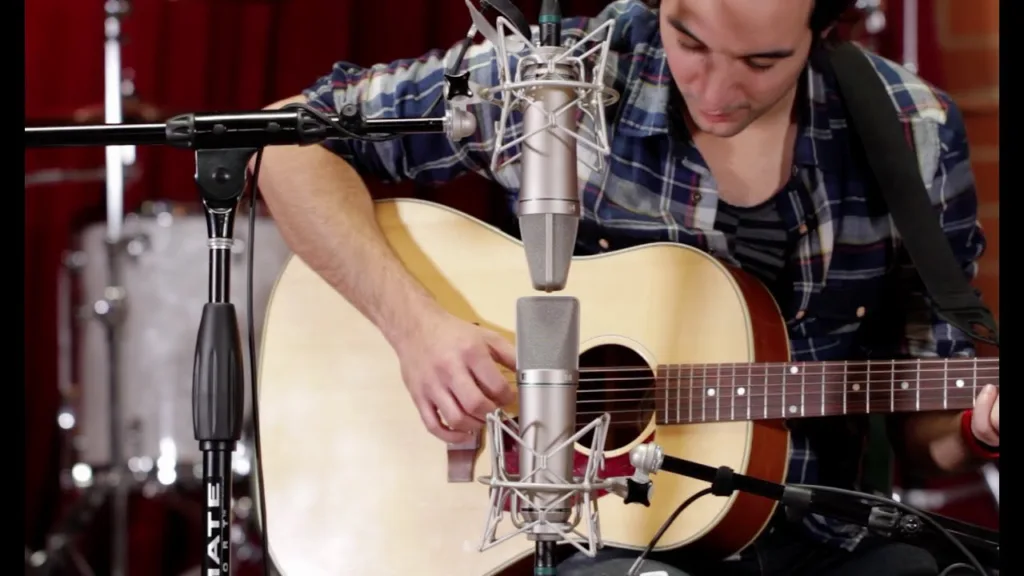
2. Position the mic: The placement of the microphone is crucial in achieving clear sound quality. For a balanced tone, place the mic about 6-12 inches away from the guitar’s sound hole at a slight angle towards the neck of the guitar. Experiment with different positions until you find one that works best for your desired sound.
3. Use a pop filter: If you’re using a condenser mic, it’s important to use a pop filter to reduce any unwanted popping or sibilance sounds caused by vocalizations or strumming patterns.
4. Consider room acoustics: The environment in which you record can greatly affect the overall sound quality of your recording. Try setting up in a room with good acoustics and minimal background noise to ensure clean and clear audio.
5. Adjust EQ settings: Every acoustic guitar is unique and may require some tweaking of EQ settings to achieve optimal sound quality through your chosen microphone setup. Play around with bass, midrange, and treble levels until you find what works best for your specific instrument.
6.Capture multiple tracks: For more depth and complexity in your recording, try capturing multiple tracks by using different microphones on various parts of the guitar such as near the bridge or fretboard.
7.Test before recording: Before hitting record on your final take, do some test runs first to make sure everything sounds how you want it to be captured on tape (or digitally).
With these steps in mind, you’ll be able to successfully mic an acoustic guitar for clear and professional-sounding results every time!
Understanding the Best Types of Microphones for Acoustic Guitars
When it comes to capturing the warm, rich sound of an acoustic guitar, choosing the right microphone can make all the difference. Dynamic microphones are popular for live performances because they handle high sound pressure levels well and are quite durable. They tend to pick up less background noise, which makes them ideal for noisy environments. On the other hand, condenser microphones shine in studio settings where clarity and detail matter most. These mics have a wider frequency response and sensitivity that beautifully captures the nuances of fingerpicking or strumming patterns.
Another great option is using a combination of both types—a dynamic mic for live shows paired with a condenser mic in recordings—to get a fuller sound profile. It’s also worth considering placement techniques. For instance, placing a microphone about 12 inches away from the sound hole can yield rich bass tones while moving closer to the neck provides sweeter highs. Here’s what you should remember when selecting your gear:
– Purpose: Live vs Studio
– Type: Dynamic vs Condenser
– Placement: Distance from guitar
With careful selection and placement, any musician can enhance their acoustic tone remarkably!
Read also: how to mic an acoustic guitar
Exploring Different Mic Placement Techniques for Acoustic Guitars
When it comes to capturing the rich, warm tones of an acoustic guitar, mic placement is crucial. One common technique involves placing a microphone about 12 inches away from the soundhole. This distance allows for a balanced mix of body resonance and string clarity, creating a fuller sound that brings out the guitar’s natural beauty. Experimenting with angles can also lead to delightful results; tilting the mic slightly toward the neck can highlight those bright notes while still maintaining warmth from the body.
Another effective method is using two microphones: one near the soundhole and another positioned by the fingerboard. This stereo approach captures both depth and detail in your recordings. You might find that placing one microphone at a slight angle adds an interesting dimension to your overall sound, giving listeners a sense of space as if they are right there beside you while you play. Remember that every guitar has its unique voice, so feel free to try
- different distances
- angles
- and even environments
when setting up your mics; sometimes, an unexpected spot can yield magical sounds! In this journey of exploration, patience will reward you with beautiful tones tailored just for your style.
Mastering Single-Mic Setup for Clear Acoustic Guitar Sound Quality
Getting the best sound from your acoustic guitar using a single microphone can be an art form. Start by choosing the right mic; a condenser mic is often preferred for its sensitivity and warmth. Position it about 12 to 18 inches away from the guitar, aimed at the sound hole or slightly above it. This placement captures both the rich bass tones and crisp high notes without overwhelming distortion. Experiment with angles—turning the mic slightly can create different textures in your recording, making each performance unique.
To ensure clarity in your recordings, control your environment as much as possible. Try to find a quiet space with minimal background noise; soft furnishings like curtains and rugs can absorb unwanted echoes that muddy your sound quality. Additionally, keep an eye on levels; use headphones while you play to monitor how well everything sounds together. If you’re picking up too much treble or muddiness, adjust your distance or angle until you achieve that sweet spot where every note shines through clearly.
Remember, practice makes perfect! It might take several tries before you discover what works best for capturing those beautiful chords and melodies on tape—all part of mastering this intimate setup.
Avoiding Common Mistakes When Micing an Acoustic Guitar
When recording an acoustic guitar, the placement of the microphone is crucial in capturing its rich tones. Beginners often make the mistake of positioning the mic too close to the sound hole. This can result in a boomy and overly bass-heavy sound that lacks clarity. Instead, try placing your microphone about 6-12 inches away from where the neck meets the body of the guitar. This spot captures a balanced mix of warmth and brightness, producing a more natural tone. Experimenting with angles can also yield delightful surprises; tilting your mic slightly off-axis helps reduce unwanted plosive sounds while still picking up that sweet resonance.
Another common pitfall is neglecting to consider room acoustics during recording sessions. The environment plays a significant role in how sound waves travel and bounce around, affecting overall quality. To combat this issue, aim to record in a space with soft furnishings or use acoustic panels to dampen echoes and reflections that could muddy your sound. Choosing between different types of microphones—like condenser versus dynamic—adds another layer of nuance; for instance, condensers generally capture finer details but may be more sensitive to background noise. By avoiding these missteps, you’ll find yourself on a clearer path toward achieving beautiful acoustic recordings!
You may also like: how to sell a piano
Conclusion: Perfect Your Acoustic Guitar Recording Technique with Proper Mic Usage
When it comes to capturing the beautiful sounds of your acoustic guitar, using microphones correctly can make all the difference. Think about how a painter carefully selects their brushes and colors; similarly, choosing the right microphone is crucial. There are various types of microphones—like dynamic and condenser—that each have their own strengths. For example, condenser mics tend to pick up more detail in soft sounds, making them ideal for delicate fingerpicking or intricate melodies. On the other hand, dynamics excel at louder performances without distortion.
Positioning your microphone properly adds another layer of magic to your recordings. Placing it too close can capture harsh tones while being too far away may lose warmth. Aim for about 6 to 12 inches from where the neck meets the body of your guitar; this spot often yields a rich balance between brightness and depth. Experiment with angles—the sound changes dramatically with slight adjustments! You might also want to consider room acoustics; recording in a cozy space can add natural reverb that enhances tonal quality. With patience and practice, you’ll find that mastering mic techniques transforms not just your recordings but also how you hear and play music itself!