
Are you new to playing the classical guitar and struggling with tying your strings? Or maybe you’ve been playing for a while but still don’t feel confident in this aspect of maintenance. Well, you’re not alone. As a fellow classical guitarist, I know firsthand how daunting it can be to properly tie those pesky strings on our delicate instruments.
But fear not! In this article, I will guide you step-by-step through the process of tying classical guitar strings, from choosing the right type of string to securing them in place. With my personal expertise and experience as well as tips and tricks from other professional musicians, you’ll soon become a master at tying your own strings – no more relying on expensive trips to the guitar shop!
So whether you’re preparing for your next performance or just need to restring your favorite instrument at home, keep reading because by the end of this article, you’ll have all the knowledge and confidence needed to perfectly tie any classical guitar string like a pro!
So, how to tie classical guitar strings?
Tying classical guitar strings can be a daunting task for beginners, but with the right technique and practice, it becomes second nature. In this step-by-step guide, we will walk you through the process of tying your classical guitar strings like a pro.
Step 1: Preparing Your Strings
Before starting to tie your strings, make sure you have all the necessary materials – your new set of strings, wire cutters or scissors, and a tuner. Lay out your new strings in the order they will be placed on the guitar (from thickest to thinnest).
Step 2: Remove Old Strings
If you are replacing old strings, carefully remove them one at a time using wire cutters or scissors. This prevents damage to the bridge or tuning pegs.
Step 3: Inserting New String into Bridge
Take your first string (thickest) and insert it into the hole on the bridge from inside to outside. Leave about an inch of excess string sticking out towards the neck of the guitar.
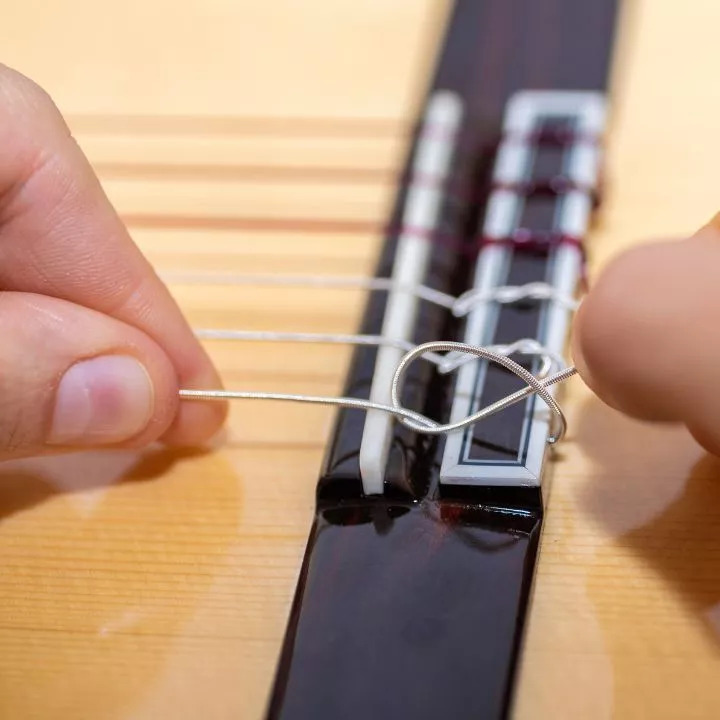
Step 4: Creating A Loop
Next, take that extra inch of string and bend it upwards towards yourself creating a loop around itself.
Step 5: Wrapping Around The String
Wrap this loop around itself two times tightly towards yourself making sure there are no gaps between each wrap.
Step 6: Pulling Tight
Once wrapped twice around itself tight enough so that it stays in place without slipping off its own tension when pulled tautly by hand,
Step 7: Securing The String
Carefully pull both ends of the string until it is snug against the bridge. Then use pliers or your fingers to gently tighten and secure any remaining slack in between wraps.
Step 8: Cutting Excess String
Using wire cutters or scissors, trim off any excess string beyond where it is secured at both ends.
Step 9: Repeating Steps For Remaining Strings
Repeat steps 3-8 for the remaining strings, making sure to leave enough slack between each string for proper tuning.
Step 10: Tuning Your Guitar
After all strings are tied and secured, it’s time to tune your guitar. Use a tuner or tune by ear using a reference note. Make any necessary adjustments by tightening or loosening the strings until they are in tune.
Congratulations! You have successfully tied your classical guitar strings and are ready to start playing beautiful music. Remember to change your strings regularly for optimal sound quality and enjoy the process of mastering this essential skill for any guitarist.
Understanding the Different Types of Classical Guitar Strings
When diving into the world of classical guitar strings, you’ll discover a fascinating variety that can greatly affect your playing experience. Generally, these strings are made from three main materials: nylon, fluorocarbon, and gut. Nylon strings are perhaps the most common choice for beginners and seasoned players alike due to their warm tone and comfortable feel. They produce a mellow sound that is perfect for traditional music styles. On the other hand, fluorocarbon strings tend to be brighter and more focused than nylon ones. Many musicians prefer them because they resist changes in humidity and temperature better than their nylon counterparts. Lastly, gut strings, while not as popular today due to their sensitivity to environmental factors, offer a rich tonal quality reminiscent of early classical music.
Choosing the right string type goes beyond just personal preference; it also depends on your playing style and what you want to achieve musically. For example, if you’re looking for crisp clarity in your melodies or powerful projection during performances, experimenting with different string brands can lead to delightful discoveries! Here’s a quick guide:
- Nylon: Warmth & Comfort
- Fluorocarbon: Brightness & Stability
- Gut: Richness & Tradition
Finding harmony between these elements will help you craft your unique sound on this beautifully expressive instrument!
Read also: what is a guitar saddle
The Essential Tools Needed for Tying Classical Guitar Strings
Tying classical guitar strings can be a simple yet fulfilling process, especially when you have the right tools at hand. First and foremost, you’ll need high-quality new strings suitable for your guitar’s size and style. The variety available—from nylon to composite—means you should choose according to your sound preference and playing technique. Having a pair of wire cutters is also essential; they help trim any excess string after you’ve tied it on the tuning pegs, giving your instrument a neat appearance. Lastly, invest in a peg winder if you’re looking to save time during string changes; this handy tool speeds up the winding process significantly.
Additionally, consider having some string lubricant nearby as it can enhance performance by reducing friction between the strings and frets. A tuner is another must-have because freshly installed strings often require several adjustments before settling into tune. It’s also wise to keep a soft cloth close by for cleaning both your hands and guitar once you’re done with restringing. This will not only ensure that you avoid dirt buildup but will ultimately prolong the life of those shiny new strings! By gathering these essential tools, you’ll make tying classical guitar strings an easier task that lets you focus more on making beautiful music rather than fussing over equipment or technique.
Step-By-Step Guide on How to Tie Classical Guitar Strings
Tying classical guitar strings can feel a bit tricky at first, but with a little practice, you’ll find it quite satisfying. Start by gathering your tools: a set of new nylon strings and a pair of wire cutters if needed. Begin by removing the old strings; simply unwind them from the tuning pegs and discard them. Now take your new string and locate the end with the ball—this is usually on one side. Gently thread this end through the hole in the bridge, pulling it until it’s snug against the wood, leaving enough length to work with.
Next comes securing it at the tuning peg. Insert that same string into its designated peg slot and pull it tight while wrapping it around several times in an upward spiral.
Be mindful not to overlap too much as you want each coil to sit neatly next to each other for better tuning stability. After about four or five wraps, hold tension on the string while gently turning the tuner clockwise until you reach your desired pitch.
It’s essential to stretch each string carefully once they are all installed; this helps prevent slipping later on. With practice, tying these strings will become second nature!
Troubleshooting Common Problems When Tying Classical Guitar Strings
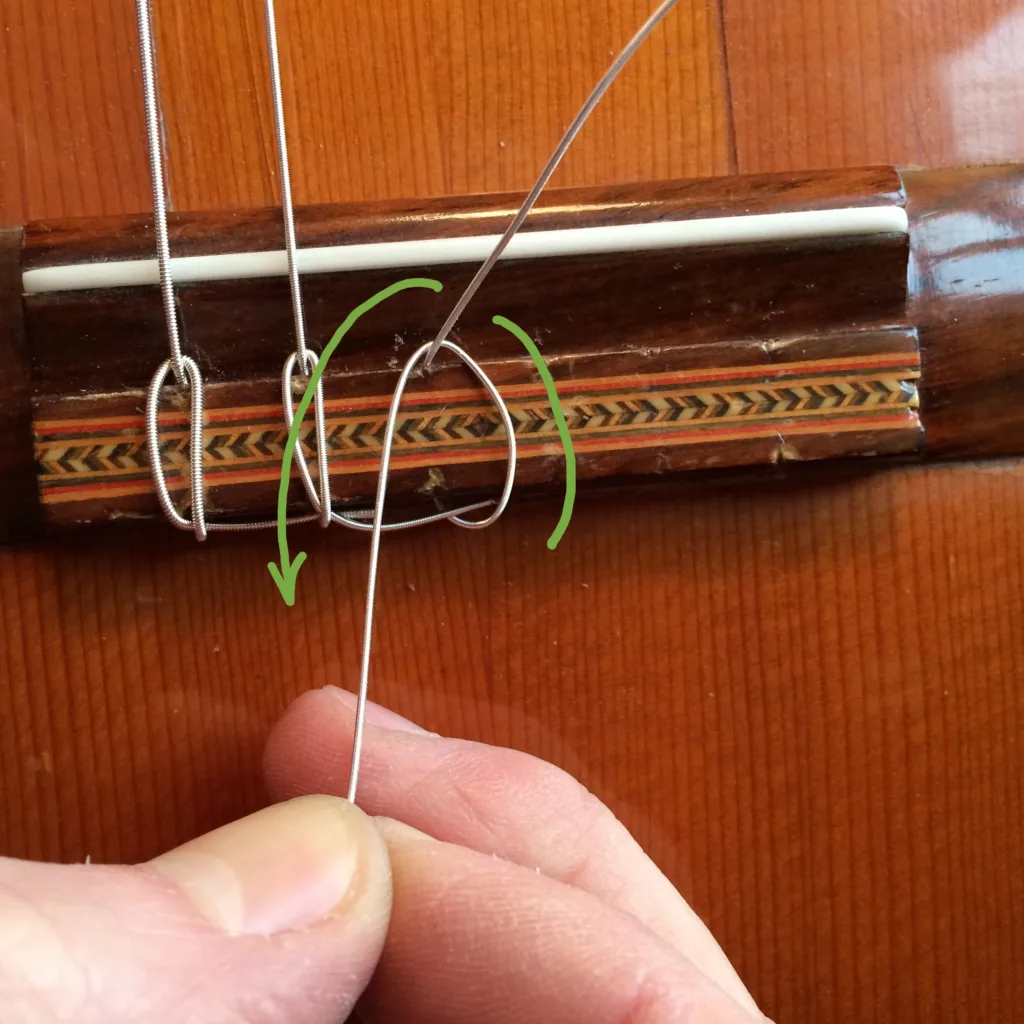
Tying classical guitar strings can sometimes feel like a puzzle, especially if you’re new to the instrument. One common issue is when the string slips out of place after being tied. This often happens if the knot isn’t tight enough or if there are too many twists in the string itself. To avoid this, ensure you’re using a proper knot method, such as the double knot technique. Start by making a simple knot and then looping it again before pulling both ends tightly. This helps create a secure hold that’s less likely to slip during practice or performance.
Another frequent problem is uneven tension across all strings, which can lead to tuning issues and an unbalanced sound. If one string feels tighter than another while playing, check how you’ve wound each string on its tuning peg. It’s essential to keep your winds neat and evenly spaced; this not only looks good but also ensures consistent tension across your set-up. A useful tip is to use
- at least three winds for thicker strings
- two or three for lighter ones
, aligning them neatly from bottom to top on the peg post. Regularly checking these details will help maintain your guitar’s playability and overall performance!
You may also like: What guitar does Zach Bryan play
Conclusion: Building Confidence and Mastery in Tying Your Own Classical Guitar Strings
Tying strings on a classical guitar may seem daunting at first, but with practice, it can become second nature. When you approach your guitar and gather your tools—new strings, wire cutters, and perhaps a peg winder—you’re not just preparing for maintenance; you’re embarking on a journey toward mastery. Start by carefully removing the old strings to lay the groundwork for fresh melodies. As you prepare to attach new ones, take a moment to appreciate the craftsmanship of your instrument. Each string plays a vital role in producing rich tones that resonate through music.
Once you have chosen the right gauge of nylon or fluorocarbon strings suitable for your style, it’s time to get hands-on! Begin by threading each string through its designated hole in the bridge—the part where harmony meets wood—and pull it snugly into place. Then wrap it around the tuning pegs with care; ensure that each coil lies neatly beside one another, creating an uncluttered appearance that will aid in tuning stability.
- Maintain tension
- Breathe deeply
- Embrace mistakes as learning opportunities
With every successful tie and turn of those pegs, you’ll feel confidence build as if you’re crafting magic from mere strands of nylon.