
Are you tired of your guitar frets feeling rough and looking dull? Do you want to learn how to take care of your instrument like a pro? As a guitarist myself, I understand the importance of having smooth and shiny frets for optimal playability. And after years of trial and error, I’ve finally perfected the technique for polishing guitar frets at home. Whether you’re a beginner or an experienced player, this step-by-step guide will walk you through the process so that you can have your guitar feeling and looking its best in no time.
In this article, we’ll cover everything from what materials you need to prepare, proper cleaning techniques, and tips for achieving that professional shine. By the end of this guide, not only will your fretboard be squeaky clean but it will also feel smoother than ever before! So let’s get started on learning how to polish guitar frets like a pro!
So, how to polish guitar frets?
Polishing guitar frets is an essential part of maintaining your instrument and keeping it in top playing condition. Not only does it improve the overall appearance of your guitar, but it also helps to prevent any corrosion or buildup on the frets that can affect the sound quality.
Here is a step-by-step guide on how to polish guitar frets like a pro:
Step 1: Gather Your Materials
To properly polish your guitar frets, you will need some specific materials. These include fine steel wool (0000 grade), metal polish such as Brasso or Nevr-Dull, clean cloths, masking tape, and lemon oil (optional).
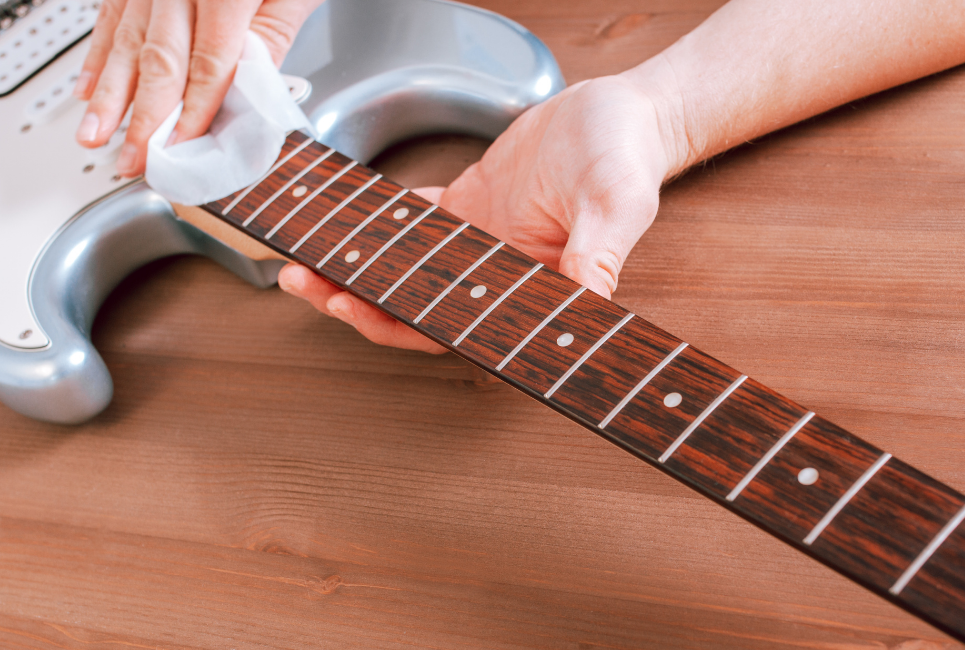
Step 2: Prepare Your Guitar
Before starting the polishing process, make sure to remove all strings from your guitar. This will give you better access to the fretboard and make it easier to work on each individual fret.
Step 3: Tape Off Fretboard
Using masking tape, cover both sides of the neck where it meets with the body of the guitar. This will protect your wood finish from being damaged during polishing.
Step 4: Clean The Frets
Take a clean cloth and wipe down each individual fret to remove any dirt or debris that may be present. Make sure they are completely dry before moving onto the next step.
Step 5: Apply Metal Polish
Squeeze a small amount of metal polish onto a clean cloth and rub it onto one side of a single fret at a time using circular motions. Be careful not to get any polish on other parts of your guitar besides just the metal part of each individual fret.
Step 6: Use Steel Wool
Once you have applied metal polish to all of your frets, take fine steel wool (0000 grade) and gently rub over each polished area in straight lines following along with grain direction until all tarnish has been removed. You can use more pressure for tougher spots but be careful not to damage the frets.
Step 7: Wipe Off Residue
Using a clean cloth, wipe off any excess metal polish and steel wool residue from each individual fret. Make sure they are completely dry before moving onto the next step.
Step 8: Optional – Apply Lemon Oil
If desired, you can apply lemon oil to your fretboard using a clean cloth. This will help to condition and protect the wood while also giving it a nice shine.
Step 9: Remove Tape
Carefully remove the masking tape from both sides of the neck, being cautious not to accidentally scratch or damage your guitar finish.
Congratulations! You have now successfully polished your guitar frets like a pro. Your instrument should look shiny and new, with improved playability and sound quality. It is recommended to repeat this process every few months or as needed for maintenance purposes. Happy playing!
Understanding the Importance of Polished Guitar Frets
When you’re strumming a guitar, the frets play a crucial role in creating beautiful music. Polished guitar frets make a world of difference in your playing experience. Imagine running your fingers along smooth, shiny metal; it’s not only satisfying but also enhances your ability to slide between notes effortlessly. A well-maintained fretboard allows notes to ring out clearly and helps prevent unwanted buzzing sounds that can ruin a song’s charm. Without polish, grimy buildup can cause resistance and even alter how the strings vibrate when pressed down.
Moreover, polished frets contribute significantly to long-term instrument care. Regular maintenance can protect against wear and tear caused by sweat and dirt from our hands while we play. This process often involves removing oxidation or tarnish that develops over time, ensuring each fret remains as functional as possible for years to come. By taking the time to clean and polish them regularly, you’ll not only enhance sound quality but also prolong the life of your instrument itself.
In essence, investing effort into maintaining polished guitar frets leads to smoother performances and preserves your beloved instrument’s integrity for future jams!

Read also: yamaha electric bass guitar
Preparation: Gathering the Necessary Materials and Tools for Polishing Guitar Frets
When it comes to polishing guitar frets, gathering the right materials and tools is crucial for achieving that smooth, shiny finish. First, you’ll want to collect some fine grit sandpaper or fret files, as these will help remove any tarnish and smooth out rough spots on the frets. Adding a few different grits—like 400, 800, and even 1000—can make a huge difference in the final look. Don’t forget the masking tape! A roll of this handy tool can act as your best friend by protecting the wood of your guitar’s neck while you work on those shiny metal frets. Finally, invest in some fret polish or cleaner; these products are designed specifically for metals and will add an extra level of shine.
In addition to these essentials, having a soft microfiber cloth at hand will allow you to wipe away dust or debris during your project. If you’re feeling extra careful (and who wouldn’t?), consider using a small toothbrush for detailed cleaning around each fret’s edges. It might also be beneficial to have safety glasses nearby; protecting your eyes from flying particles is always wise! So gather up all these supplies first—you’ll find that being prepared makes the process smoother and more enjoyable as you transform those dull frets into gleaming works of art!
Step-by-Step Guide to Cleaning Your Guitar Frets
Cleaning your guitar frets is essential for maintaining sound quality and playability. Over time, dirt and grime can build up, making it harder to press down strings comfortably. To start, lay your guitar flat on a soft surface to prevent scratches. Grab a clean cloth or rag and some fretboard conditioner—this helps keep the wood nourished.
Begin by applying the conditioner sparingly to the cloth, then gently rub it along the frets in small circles. You’ll see any old residue lift away as you work; it’s almost like watching magic unfold!
Once the initial cleaning is done, use a fine-grade steel wool or specialized fret cleaner for stubborn spots. Make sure you’re cautious around the pickups if your guitar has them! As you scrub softly between each fret, you’ll uncover a polished finish that enhances both appearance and sound quality. After this meticulous process, wipe off any remaining particles with a dry cloth to ensure everything shines bright again. Finally, don’t forget to tune your guitar after cleaning—it brings out those beautiful notes even more clearly! With these simple steps followed closely, your instrument will be ready for many musical adventures ahead!
Techniques for Achieving a Professional Shine on Your Guitar Frets
Getting your guitar frets to shine like new can really enhance your playing experience. First, start by gathering the right tools: a soft cloth, fretboard conditioner, and fine steel wool or fret polish. Remember to remove the strings before you begin; this allows for easy access while protecting them from any cleaning products. With everything ready, gently rub the steel wool along each fret. This helps eliminate grime and tarnish that may have built up over time. Be sure to move in one direction across the frets rather than back and forth—this technique prevents scratches.
Once you’ve polished away dirt and oxidation, it’s important to nourish your fretboard with a quality conditioner. Apply a small amount of conditioner onto a clean cloth and wipe it over the wood surface with gentle strokes. This will not only enhance its natural beauty but also protect against future wear and tear. For an extra touch of care, consider using lemon oil sparingly on rosewood or ebony fingerboards as it helps keep them moisturized without causing damage.
And finally, after letting everything sit for a bit, simply re-string your guitar! You’ll be amazed at how much brighter those frets look—and how much more enjoyable it is to play!
You may also like: Can you plug in a Yamaha TransAcoustic guitar
Conclusion: Reviewing Key Takeaways & Maintenance Tips for Long-lasting Guitar Fret Polish
When it comes to maintaining your guitar, paying attention to the fret polish is essential. Keeping those frets shiny not only enhances the overall look of your instrument but also improves playability. A well-polished fretboard allows for smoother finger movement, making it easier to glide from one note to another. Over time, grime and buildup can dull the metal surface, so regular cleaning is crucial. Start by using a soft cloth or microfiber towel with a bit of lemon oil or specialized guitar cleaner to gently wipe away any dirt and oils from your fingers that might have accumulated on the frets.
After polishing, it’s important to incorporate some maintenance tips into your routine for lasting results. One key takeaway is to avoid excessive moisture; always keep your guitar in a controlled environment where humidity levels are stable. Additionally, consider using protective products designed specifically for guitars when you clean—this helps prevent damage while ensuring longevity. Regularly inspect your frets for signs of wear or oxidation and address these issues promptly before they escalate into bigger problems. By following these simple practices and being mindful of how you care for your instrument, you’ll be rewarded with a beautifully maintained guitar that’s ready for any musical journey!