

Is your acoustic guitar not playing as smoothly or sounding as crisp as it used to? The culprit could be the action, or the distance between the strings and the fretboard. But don’t worry- adjusting the action on your guitar is easier than you think! As a guitarist myself, I’ve faced this issue many times and have learned all about how to fix it. And today, I’m sharing my expertise with you.
In this step-by-step guide, we’ll go through the simple process of adjusting the action on your acoustic guitar. From identifying if there’s an issue with your current setup to making necessary adjustments with tools you already have at home, we’ll cover everything you need to know. Whether you’re a beginner or an experienced player looking for some tips and tricks, this article is for YOU. So let’s get started and give your old trusty guitar a new lease on life!
So, how to adjust action on acoustic guitar?
Adjusting the action on your acoustic guitar is an important step in maintaining its playability and sound. The action refers to the distance between the strings and the fretboard, which can greatly affect how easy or difficult it is to play your guitar. A high action can make playing more challenging, while a low action can cause buzzing and other issues.
To adjust the action on your acoustic guitar, you will need a few tools: a capo, a ruler or feeler gauge, and possibly an Allen wrench for some models of guitars. Follow these steps:
Step 1: Check Your Current Action
Before making any adjustments, it’s important to know where your current action stands. Use a ruler or feeler gauge to measure the distance between the top of your 12th fret and the bottom of each string. This measurement should be around 3/32 inches for most acoustic guitars.
Step 2: Determine If You Need To Raise Or Lower The Action
Depending on what you measured in Step 1, you may need to either raise or lower the action on your guitar. If your measurement was higher than 3/32 inches, then you’ll need to lower it by adjusting the truss rod (more on that later). If it was lower than 3/32 inches, then you’ll need to raise it by adjusting either the saddle height or nut slots.
Step 3: Adjust The Truss Rod (If Needed)
The truss rod is located inside your guitar’s neck and controls its curvature. To adjust it, use an Allen wrench (or whatever tool is specified for your particular model) at one end of the neck where there is usually a small hole for access. Turn clockwise if you want to decrease relief (lowering string height), or counterclockwise if you want to increase relief (raising string height).
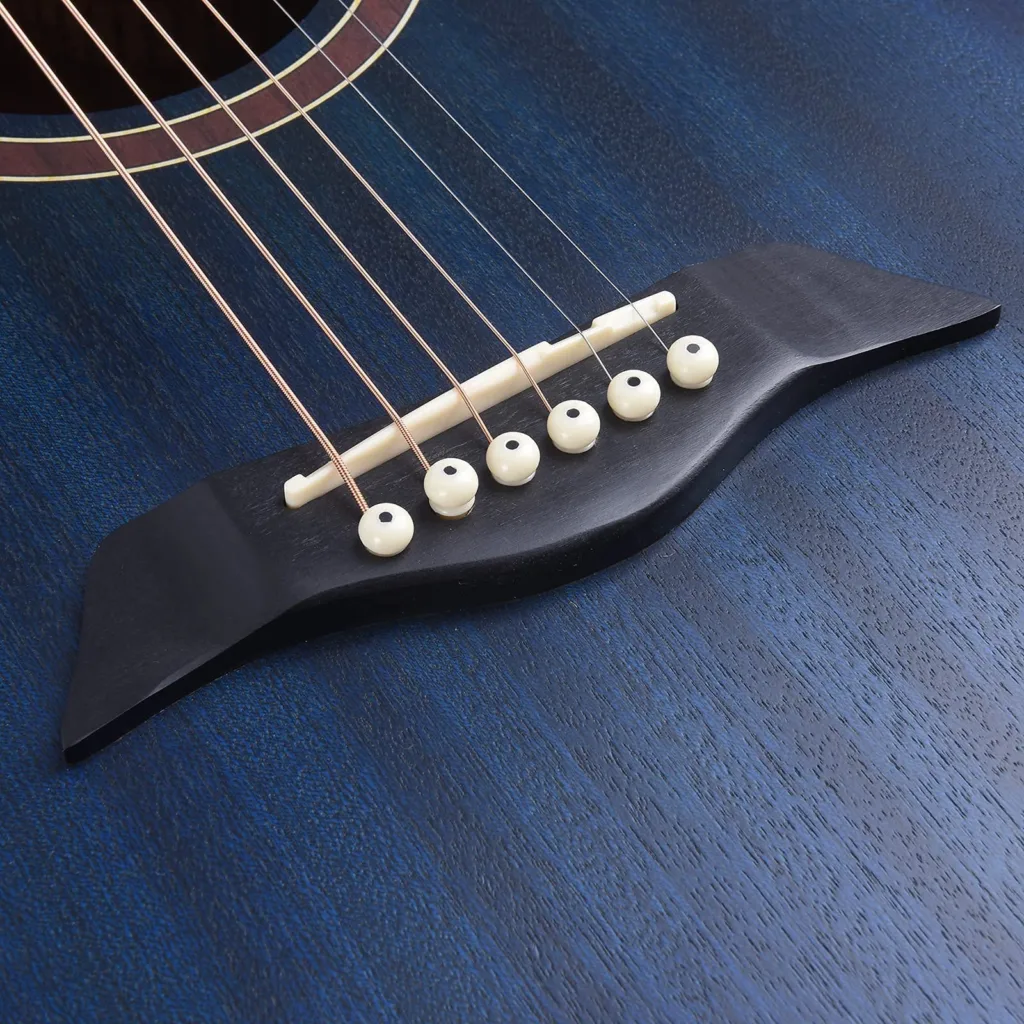
Step 4: Adjust Saddle Height Or Nut Slots (If Needed)
If your action is still not at the desired height after adjusting the truss rod, you can make further adjustments by raising or lowering the saddle height or nut slots. These are located at the bridge and nut of your guitar, respectively. Use a small wrench to adjust the screws or nuts that hold them in place.
Step 5: Check And Fine-Tune
After making any adjustments, it’s important to check your action again using a ruler or feeler gauge. You may need to fine-tune it by repeating steps 3 and 4 until you reach your desired action.
In conclusion, adjusting the action on your acoustic guitar may seem intimidating at first, but with these simple steps and some practice, you’ll be able to do it yourself. Just remember to take caution when making any changes and always double-check your measurements before playing. A well-adjusted action can greatly improve your playing experience and keep your guitar sounding its best!
Identifying a High or Low Action Issue on Your Acoustic Guitar
When you pick up your acoustic guitar, the feel of the strings beneath your fingers can tell you a lot about its setup. If you’re struggling to press down on the strings or if they seem unusually high from the fretboard, you might be dealing with a high action issue. This means that the distance between the strings and the fretboard is greater than it should be. High action can make playing challenging and tiring, especially for beginners. You might notice string buzz when fretting notes or chords that are further up the neck, which can make beautiful melodies sound sour.
On the flip side, if your guitar feels like it’s practically playing itself—with little resistance as you strum—you could have a low action issue. Low action refers to strings being too close to the fretboard, resulting in an easy playability but potentially leading to unwanted buzzing sounds during play. This situation often arises from wear over time or adjustments made carelessly. To determine whether you’re faced with one of these issues, consider examining string height at different points along your fretboard. A few simple adjustments by a knowledgeable professional can dramatically improve how your guitar responds to touch and enriches your musical experience!
Read also: 12 string guitar tuning machines
Understanding the Role of the Truss Rod in Adjusting Guitar’s Action
A truss rod is a vital component of a guitar, acting like an adjustable backbone for the instrument. This long metal bar runs through the neck and allows musicians to control its curvature. When you think about how a guitar feels when you play it, much of that comes down to the action—the distance between the strings and the fretboard. If this distance is too high, it can make playing difficult and uncomfortable; if it’s too low, notes may buzz unpleasantly against the frets. By tightening or loosening the truss rod, players can fine-tune this action to suit their personal preferences.
Adjusting the truss rod isn’t something to rush into; it requires care and attention. A few small turns might be all that’s needed!
Here’s what happens during adjustments:
– Tightening bends the neck back (reducing action).
– Loosening lets it bow forward (increasing action).
Players should always check string height after making changes since even slight adjustments can significantly impact playability. Understanding how your guitar’s truss rod works helps create an instrument that truly fits your playing style—making every chord ring out beautifully without struggle or fuss!
How to Correctly Measure String Height for Optimal Acoustic Guitar Action
When it comes to playing the guitar, the height of the strings above the fretboard—known as action—plays a crucial role in how comfortable and enjoyable your instrument feels. To measure string height accurately, you’ll first need a reliable ruler or string action gauge. Start by pressing down on the first and last frets of your guitar simultaneously; this helps determine any relief in the neck. Next, use your measuring tool to check the distance between the bottom of each string and the top of a fret around where it meets its midpoint. Generally, optimal action is about 1/8 inch for electric guitars and slightly higher for acoustic types.
Once you’ve taken these measurements, it’s important to make necessary adjustments based on personal preference and playing style. If you find that your strings are too high, which might cause discomfort while playing, consider lowering them by adjusting either saddle height or nut slots carefully. Conversely, if they’re too low—which can lead to buzzing sounds—you may want to raise them accordingly. Remember that small changes can make a big difference! Regularly checking string height ensures that you maintain an ideal setup that balances playability with sound quality.
By keeping everything fine-tuned just right, you’ll enjoy every strum even more!
Step-by-Step Guide: How to Adjust the Truss Rod for Better Guitar Action
Adjusting the truss rod of your guitar can feel a bit intimidating at first, but with a little guidance, it becomes quite manageable. The truss rod is a metal bar inside the neck that helps control its curvature, or relief. When you want to improve your guitar’s action—that’s how high the strings sit above the fretboard—you’ll need to tweak this rod. Start by checking your current setup: press down on the first and last frets simultaneously while measuring about halfway along the neck. You should see a small gap at around the 8th fret; ideally, it’s about 0.25mm (the thickness of a business card). If there’s too much space or not enough, adjustments are necessary.
To make changes, use an appropriate wrench to turn the truss rod nut clockwise for less relief (lower action) or counterclockwise for more relief (higher action). Make tiny adjustments—no more than a quarter turn—to avoid over-correcting and causing damage. After each adjustment, let it settle for several hours before rechecking measurements; wood takes time to adjust! Keep in mind that humidity and temperature can affect wood tension as well; so play regularly and monitor any shifts in performance as seasons change.
By taking these careful steps, you’ll have smoother playing and sweeter sounds from your beloved instrument!
You may also like: wurlitzer upright piano weight
Conclusion: Maintaining and Fine Tuning Your Acoustic Guitar’s Action Over Time
Keeping your acoustic guitar in top shape is like tending to a garden; it requires care, attention, and sometimes, a bit of adjustment. One essential aspect of this maintenance is the action—the height of the strings above the fretboard. If your strings are too high, playing can feel like climbing a steep hill; conversely, if they’re too low, you might hear annoying buzzes that ruin your beautiful sound. To find that sweet spot where comfort meets playability, check for any signs: do your fingers ache after strumming? Does the sound come out clear or muffled? Regularly assessing these factors will help you keep everything just right.
Adjusting action involves understanding various components like the nut and saddle. Sometimes it’s as simple as filing down those parts to lower string height or adding shims to raise them gently when needed. Remember, seasonal changes can affect wood and tension, so be mindful as humidity levels shift through summer into winter months. With time and practice, fine-tuning becomes more intuitive—watch for things like how well notes ring out or how easily bends happen during solos. By maintaining meticulous attention to detail in both setup and adjustments over time, you’ll ensure that your guitar remains perfectly tuned for years to come.